 Gemboel Technology - Windows 8 includes a ton of great new features that are easy to overlook amidst the sturm und drang over the Start screen. Meet Storage Spaces, a new Windows utility that allows you to connect multiple data storage devices (internal and external) that rely on different interfaces (SATA hard drives, USB flash drives, and Serial Attached SCSI drives, for example) to your PC and treat them as a single giant storehouse dubbed your “storage pool.”
You can divide that pool into spaces with names like ‘My Movie Space’ or ‘Jane’s Spreadsheets’ that function exactly like traditional formatted Windows directories. In fact, it isn’t entirely accurate to describe your motley crew of heterogeneous hard drives as a pool; the spaces in Storage Spaces are actually formatted with a unique file system that renders all incorporated hard drives inaccessible to Windows proper.

Use Storage Spaces to transform your external drives into a redundant virtual storage drive that you can expand as needed.
That’s because the spaces in Windows 8 Storage Spaces are designed to mirror the data stored in them to other drives in the pool, so you can safeguard your data against the threat of drive failure without having to pay for and maintain dedicated RAID drives. Though the Storage Spaces arrangement isn’t foolproof, it greatly increases the likelihood that—if one or more drives in your pool fail—a copy of your data will remain available (or be reconstructable) from one or more of the other drives in the pool. Storage Spaces gives you a handy way to manage large pools of data, especially ones that will gradually expand over time (such as family photo albums or movie collections).
Building your first pool
To create a new pool, first make sure that all of the storage devices you want to include are connected to your PC; then open your Windows 8 Control Panel by pressing your Windows key, typing control panel, and pressing Enter. Select the Storage Spaces option from the Control Panel, and select Create a new pool and storage space.
Windows 8 will display a list of drives attached to your PC that are compatible with Storage Spaces. Select the drives that you want to use in your new pool, but be aware that Windows 8 will format them, meaning that you’ll permanently lose any data already stored on them. Before creating a pool, click the View files option next to each drive that you wish to use, to check its contents. If you don’t see one or more of your drives listed, confirm that they’re properly connected to your PC and that they’re compatible with Windows 8. Once you’ve selected all of the drives that you want to format into your new pool, press the Create pool button at the bottom of the menu.
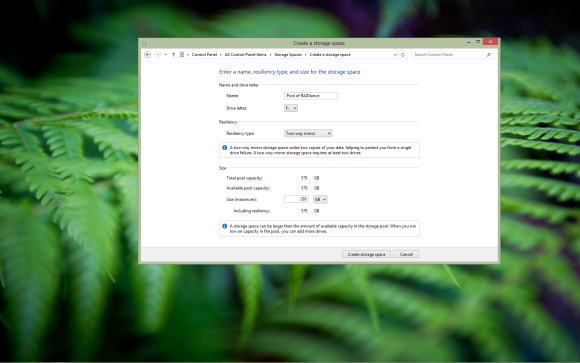
Give your space a memorable name, and then choose a resiliency type defining how your data gets copied.
Now you need to name the first storage space in your pool, assign it a drive letter and a maximum capacity, and pick your desired level of data resiliency. Name it something memorable, and don’t worry too much about the drive letter or maximum capacity; you can change those later if necessary. Do pay attention to the resiliency setting, which entails selecting how Windows 8 renders your data redundant across multiple drives in the pool. You can create pools that are resilient against one or multiple drives failing at once, though higher levels of resiliency require more drives in the pool; check the descriptions of each resiliency option for more details. Once you’re happy with your choices, click the Create storage space button at the bottom of the menu, and Windows 8 will format your new storage space.
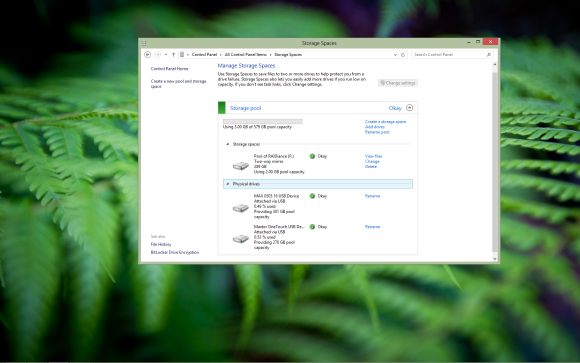
After it formats the new space, Windows 8 will list the storage pool and spaces in the Storage Spaces menu.
If all goes well, you should be redirected to the Storage Spaces menu in the Windows 8 Control Panel, where your new storage pool and the spaces it contains should be listed. You can return to this menu any time you want to make changes to your storage pool (to change names or add drives, for example), though you won’t be able to change the resiliency setting without reformatting the drives and creating a new pool. All storage spaces will show up as hard disk drives in Windows Explorer, so feel free to store files there as you would on any external hard drive. - Gemboel Technology
Source : http://www.pcworld.com/


0 comments:
Post a Comment